To install a sump pump at home is a fairly simple DIY project. However, it is real work and not for everybody. Here are the essential tools and pro tips homeowners need.
Water pumps come in many different forms. There are basement sump pumps, outdoor sump pumps, pool pumps and more.
Sump pumps are devices that extract water from a basement or crawl space. It prevents damage from flooding in your home. During heavy rains, the soil around your house will likely become oversaturated. Excess groundwater water will flow toward the sump pit, and once the pit is filled with enough water, the pump automatically turns on.
All the water inside the pump is extracted and emptied through a discharge pipe.
The sump pump’s primary purpose is to prevent groundwater from rising to the level of the basement flooring and flooding your house. Since there are two types of sump pumps, the submersible, and the pedestal , it’s a good idea to determine what type you need before installation. If it comes to it, you can always contact plumbing services for advice or professional help.
We will discuss everything you need to know about the necessary tools and the steps to install a sump pump. Let’s begin.
Table of Contents
Tools Needed To Install a Sump Pump
With enough experience in DIY projects, this sump pump installation can take about a day to complete. The concrete will require a little more time to cure before you can use it fully. The best time to start the installation process is when there is no precipitation in the air, according to the forecast, because digging a hole and positioning the pump is easier if the ground isn’t too moist. Finally, it’s time you gather the necessary tools to start. These includes:
- Jackhammer
- Cordless drill
- Jigsaw
- Reciprocating saw
- Hole saw, hacksaw
- Pencil
- A measurement tool like a tape measure
- Digging tool like a shovel
- Eye, breathing, and hearing protection
- Safety on the feet: like steel-toe boots
- Buckets.
The Zoeller 105-0001 Sump Pump Kit includes the pump, basin, check valve, basin cover, and discharge pipe. Take a look below.
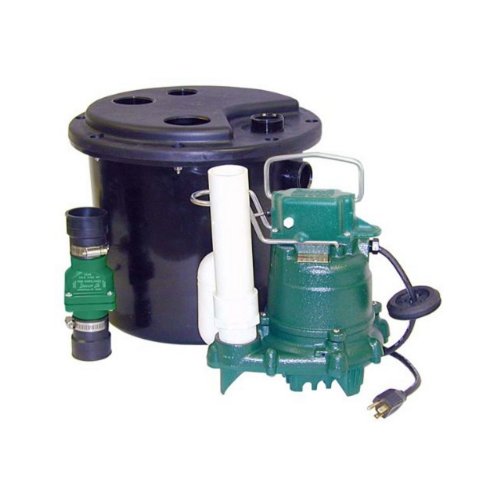
- Automatic, float operated mechanical switch 115V/1 Ph
- 1-1/2″ NPT discharge
- 9 ft. UL listed 3-wire cord and plug
- 1550 RPM, 60 Hz on 50 series models
- Non-clogging vortex impeller
For the installation of a submersible sump pump, some materials you’ll need are:
- The submersible sump pump itself
- sump basin and its lid
- well filter fabric
- Gravel
- Concrete pavers to set the sump pump on
- About 1-1/2-inch PVC pipes and elbows
- PVC pipe adhesive.
Installation Process Using Tools
Step 1: Sump Pump Placement
Turn the basin for the sump pump over and lay it on your basement concrete floor. Use a pencil to scribe a line around the basin and then remove the basin.

- Heavy duty structural foam injection molded construction
- Cover mounting metal inserts included on basin
- Compatible with Jackel 18″ diameter sump basin covers
- Gas and Radon tight; Odor free
- 20 Gallon Capacity
Step 2: Safety Equipment and Using A Jackhammer
Ensure that your steel-toe boots and eye, hearing, and breathing protection are equipped before you start this step.
Use your jackhammer and break through the concrete of the marked area. Do this starting from the center of the circle, carefully working towards the edges. Work slowly and avoid any concrete breakage outside the marked circle.
Step 3: Remove Broken Concrete
Clear out all the debris and chunks of concrete with your hand and place it into the bucket to remove it from the basement.
Step 4: Digging The Sump Basin Hole
Bring your shovel and dig out a hole in the earth beneath you and the concrete floor. Dig enough to reach the height of the sump basin and then an extra 4 inches. In short, if you have a 30-inch basin, dig a 34-inch vertical hole.
Step 5: Remove The Pipe Placement Knockouts
Use your reciprocating saw or a jigsaw to cut the knockouts in the sides of the sump basin. If your sump basin isn’t already perforated on the sides, it will be necessary to drill weep holes. Line a filter fabric on the exterior of the sump basin.

Step 6: Gravel and Paver Stone Placement
Start by pouring 4 inches of landscape gravel into the bottom of the hole you’ve dug. Then slide the sump basin into the basin’s hole in a way that doesn’t result in fabric tears. Place the paver stone in the bottom of the basin for the sump pump to sit on.
Step 7: Install A Sump Pump In The Sump Basin
Time to place your unplugged sump pump at the bottom of the basin and ensure that it is sitting level on the paver. The discharge hole at the top of the pump is where the PVC discharge pipe is connected.
Step 8: Install The Discharge Pipe
Use your tape measure to measure the distance between the discharge hole on the sump pump and where the discharge pipe will exit on the side of your house. Then use a hacksaw to cut the PVC pipes and glue them together with PVC adhesives. Cut a hole in a section of the house for the pipe’s discharge, then extend the discharge pipe per requirements. This will allow the discharged water to flow away from your house.
Step 9: Test Sump Pump Operation
Plug the sump pump into the GFCI outlet and pour clean water into the sump basin to raise the water level. The pump float should rise with the water and trigger the pump to turn on.
Step 10: Attach Sump Pump Basin Cover
Position the lid of the sump pump so that the slot on the lid is around the pump cord and discharge pipe. Your sump pump is ready to function.
The Jackel Slotted Sump Pump Basin Cover Model: SF1850S is a popular standard basin cover. See it below.

- For use with the Jackel-SF15 sump basin
- Heavy duty construction
- Perfect for pedestal or submersible sump pumps
- Slotted design provides maximum versatility
- 4 bolts included
In Conclusion On How To Install A Sump Pump
There are some essential tools that you will need to install a sump pump at home. We have mentioned the tools and materials you need and the installation process with them.
Even if you operate all of the minor household plumbing independently, some tasks neede to install a sump pump may require a professional.
In this case, installing a sump pump will likely require a professional’s help since you’re handling jackhammers and will need a clean diameter hole on the sump basin. So don’t be ashamed to let professional plumbing services take charge.
Additionally, hire an electrician to install the GFCI outlet near the sump pump.
We hope this article proved informative and will help you install a sump pump at home. Thank you for reading!
Related articles:
Superior Pump 91250 1/4 HP Utility Pump Review: 22 Best Uses
Perforated Jackel Sump Basin Review 18 x 24 Inch (SF22A-DR)
Jackel Sewage Basin Review 30-45-72-110 Gallon Comparisons
4 Radon Cover for Sump Pump Reviews: Jackel vs RadonAway
How to Choose the Best Battery for Backup Sump Pump System
Last update on 2025-06-12 / Affiliate links / Images from Amazon Product Advertising API