Having a leaking T&P valve is bad enough. But having a water heater pressure relief valve leaking after replacement is worse.
I’ll explain what to look for and how to do some DIY repairs. I’ll also let you know when it’s time to contact a local plumber.
Knowing when to hire a local licensed plumber can save you money and aggravation. I’ll let you decide if that’s necessary.
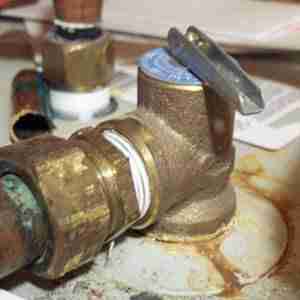
Table of Contents
DIY Guide: Fixing Water Heater Pressure Relief Valve Leaking Problems
A water heater’s T&P (temperature and pressure) relief valve leaking can be a tricky problem to fix. Any homeowner should understand why the T&P valve is leaking, and how it can be fixed.
There are several reasons that can cause a water heater pressure relief leak:
- The water temperature inside the tank is too high.
- The water pressure inside the tank is too high.
- The T&P valve installed is the wrong type.
- The T&P valve has not been used for a number of years.
- The T&P valve is faulty.
- The water heater is in a closed plumbing system.
Do you need the assistance of a Professional Plumber?
Identifying what causes a temperature and pressure relief valve to leak may be tricky and time consuming, but it is generally not that difficult.
However, if you are not confident in your abilities, or simply don’t have the time, you can get a estimate from plumbers in your area.
In this article we’ll take a detailed look at the various causes of your leak and show you how each of them can be fixed.
The T&P Valve’s Purpose
It may be a good idea at this stage to give a quick overview on the function of the T&P valve. This valve will allow steam and water to escape when either the temperature or the pressure inside the water heater tank gets too high.
Although the name indicates that both high temperature and pressure will be relieved, most T&P valves in practice only relieve high pressure. This is simply due to the fact that the water’s temperature would need to rise to an incredibly high level to trigger the valve.
Without this valve, a water heater could turn into a bomb quietly sitting right inside your home. If the pressure were to rise to a level that’s not sustainable, the water heater may explode.
Although settings between different models and brands are different, the valve is typically set to open when the pressure goes higher than 150 psi or the temperature goes higher than 210°F. If the valve is set to different parameters, it may be intended for a different appliance (not a water heater).
The Water Temperature Inside The Tank Is Too High.
The T&P valve will open if either the pressure or temperature is excessive. However, it is extremely unlikely that the valve will be triggered by high temperature, as the water would need to be close to boiling to trigger it. As this is however still a possibility, albeit unlikely, we need to cover it.
It is simple and straightforward to check the temperature of your water heater’s water. After turning on a hot water faucet and letting it run for about a minute until the water is hot, use a meat thermometer to measure the water’s temperature.
This temperature should be about 120°F. Although anything higher is dangerous, it won’t explain a faulty T&P valve. To set off the valve, the temperature needs to be close to 212°F.
The Water Pressure Inside The Tank Is Too High.
Many people automatically assume that when the T&P valve is leaking it must be broken. This is however not always the case. A T&P valve constantly leaking may in fact mean that it is working as intended by relieving excess pressure from the tank.
Determining how much pressure is in your water heater is simple to do. Purchase a No products found. and install it in your plumbing system. It doesn’t matter whether it is installed on a cold or hot water pipe as either will be under the same pressure.
Although you can connect the gauge to the plumbing at virtually any location, the simplest is to connect it to an outdoor hose faucet by using a pressure gauge that has threading specifically for a garden hose, such as the one shown below.
No products found.
The pressure in your water system should be between 40 and 80 psi while all water outlets and faucets are turned off. If the pressure is 150 psi or more, the pressure valve is probably leaking to relieve the excessive water pressure.
If the valve is however leaking with the pressure being normal, the leak is not caused by excessive water pressure in your plumbing system.
A closed plumbing system is usually the cause of excess pressure. When the water heater heats water, it causes the water to expand and this increases the pressure. In a closed system, the water can’t go anywhere and the T&P valve will open to relieve the pressure.
NOTE: For a further explanation about having a closed plumbing system, scroll down to: Hot Water Heater Pressure Relief Valve Leaking After Replacement
An excess pressure problem in a closed system can normally be solved by installing an expansion tank. This will allow the expanded hot water to flow into the expansion tank, preventing the buildup of pressure that has to be relieved via the T&P valve. This will enable the water heating process to work normally without the T&P valve constantly leaking.
If an expansion tank does not fix the high pressure problem, you may have a tank that was not installed correctly.
The T&P Valve Installed Is the Wrong Type.
Although this cause of T&P valve leakage is not very common, it is however still possible. There are other appliances, like for example boilers, that also use pressure relief valves.
Although those valves work the same as ones on water heaters, their pressure setting is much lower. Pressure valves for boilers are typically set for 30 psi, rather than the 150 psi typically used for water heater valves.
It is however very unlikely that a wrong valve would have been installed, as it would have leaked from the moment it was installed. If you have had some time between the water heater’s installation and when the valve started leaking, chances are high that the correct type of valve has been installed.
The T&P Valve Has Not Been Used For A Number Of Years.
If a pressure relief valve has not opened for a number of years, it may leak slightly once it finally opens. This type of leak is normally not serious and it seldom progresses past a minor drip. If the problem does however become more serious, the whole valve will have to be replaced.
Damage resulting from years of non-use can unfortunately be difficult to fix. Although replacing it is only really needed if it is leaking badly, even minor dripping issues can be solved easily by replacing the valve. This will prevent you from wasting time and energy trying to repair an item that costs less than $20 to replace.
The T&P Valve Is Faulty.
Another possibility is that the valve is faulty and has to be replaced. Although T&P valves are normally reasonably robust, excessive wear over time or improper installation can cause it to break down and start leaking.
Although it is technically possible to fix the valve, replacing it is by far the safest and easiest option. Replacement T&P valves typically cost less than $20, and replacing it is pretty straightforward as described below:
Replacing A T&P Valve
What you will need:
- Flathead screwdriver
- Big pipe wrench or adjustable wrench
- Pipe dope
- Teflon tape
- Garden hose
- Bucket
- A new T&P valve
Tip: Although the video only describes using Teflon tape, we recommend that a thin coat of pipe dope be spread over the Teflon tape to ensure a watertight seal.
When buying a new T&P valve, ensure that you buy the correct type. There are two types:
- Extended shank
- Short shank
The Camco 10493 3/4″ Temperature and Pressure Relief Valve with 4″ Epoxy-Coated Probe – Extended Shank is a T&P valve that has an extended shank and will fit most water heaters that use an extended shank.
The valve sometimes needs the extended shank to reach the inner tank, or it sits away from the water heater.
No products found.
The Camco 10471/10473 3/4″ Temperature and Pressure Relief Valve with 4″ Epoxy-Coated Probe is a T&P valve that has a short shank and will fit most water heaters that use a short shank. In most cases, the valve will be close to the tank.
No products found.
Turn Off The Power
The first thing you need to do is to turn off the power.
If your water heater is electric, you’ll have to identify the 220V circuit breaker for the heater and turn it off.
This has to be done to prevent the water heater from producing hot water while working on it.
As the water heater will also be drained partially, you don’t want the top element to not be immersed in water.
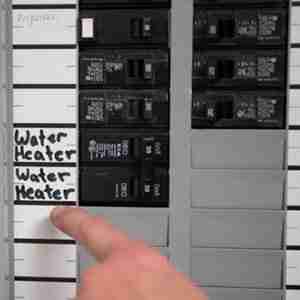
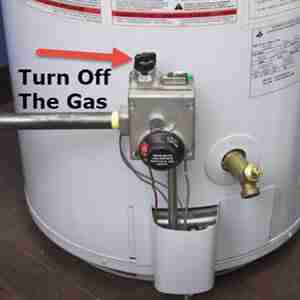
If your water heater is powered by gas, you’ll have to shut off the gas supply.
As shown in the video, the gas can be turned off at the control knob and the gas doesn’t have to be turned off all the way.
The control knob needs to be turned to the pilot or vacation setting. This will turn the burners inside the heater off, but leave the pilot light on.
If you prefer to turn off the gas, this is not a problem, but you will have to reignite the pilot when done with the replacement of the valve.
Turn Off The Cold Water Supply
Identify and close the water shut-off valve on the cold water line entering the heater. It’s normally located directly above the water heater. This will either be a gate or ball valve.
No products found.
To turn a ball valve off, turn the handle until it is perpendicular to the pipe. The water is on when the valve is in line with the pipe.
To close a gate valve, turn it clockwise.
Drain About 10 Gallons From The Water Heater
You need to drain water from the tank until the level is below the valve. Depending on the size of the tank, this should be about 10 gallons.
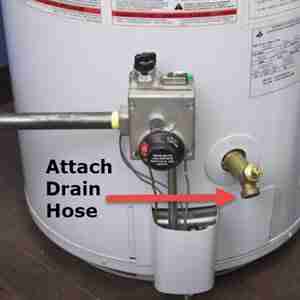
Attach a garden hose to the drain valve which will be at the water heater’s bottom. Run the hose to a floor drain or to the outside.
First open the drain valve and then open any hot water faucet to release the vacuum in the tank. Put a bucket under the T&P valve’s discharge pipe and open the T&P valve. When water no longer exits from the T&P valve’s discharge pipe, close the drain valve and remove the hose.
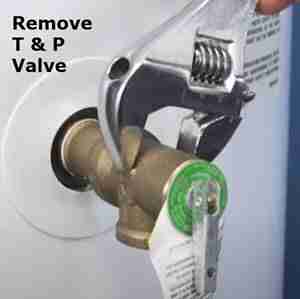
Remove The Existing T&P Valve
First remove the T&P valve’s discharge pipe by unscrewing it and setting it aside to reuse later.
In some cases, you may have to cut the pipe off.
Once you have removed the discharge pipe, use an 18″ pipe wrench or a big adjustable wrench to unscrew the T&P valve.
Some force will be required to break the seal.
Remove the existing T&P valve.
No products found.
Install The New T&P Valve
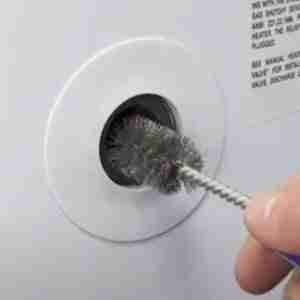
Use a small wire brush to clean the inlet. Wrap Teflon tape around the new T&P valve’s threads in a clockwise direction. Optionally, use a thin coat of pipe dope over the Teflon tape to prevent leaks.
Attach the new T&P valve by hand, then tighten it with a wrench. Make sure the T&P valve is angled downward.
Wrap the threads of the T&P valve discharge pipe in Teflon tape before reattaching it.
If this pipe had to be cut off, you’ll have to replace it with a pipe specifically rated for use with hot water. The glue used for this should also be rated for hot water use.
Turn On The Water
Once the discharge pipe has been installed and the T&P valve is tight, the cold water cut-off valve can be opened to fill the tank. Allow all air to exit through the hot water faucet before closing the hot water tap.
Check for dripping or leaks around the replaced valve. If everything went according to plan, everything will be dry.
Turn On The Power
Once everything looks good, turn on the breaker at the electrical panel, or turn the gas back on and set the desired temperature. If the gas was turned off, you’ll have to ignite the pilot light.
If none of the other possibilities described in this article work, replacing the temperature & pressure relief valve is probably the best solution. You may however prefer to contact a local plumber to replace the T&P valve.
Related Frequently Asked Questions
Must A Water Heater Have A Drain Pan?
In my opinion you should always have a drain pan under your water heater. Everybody has something in their basement or garage that they don’t want getting wet. So, better safe than sorry. However, code requirements are base upon where the water heater is installed. Usually, local codes don’t require drain pans in the basement or garage.
However, drain pans are required when located anywhere else within the house.
Do Water Heaters Need Expansion Tanks?
Most cities specify that a residential plumbing system needs to be a closed water heater system. When installing a new water heater in a closed system, building codes require an expansion tank to be installed.
Hot Water Heater Pressure Relief Valve Leaking After Replacement
If the new T&P relief valve starts leaking water shortly after being installed, it probably isn’t a faulty valve. More likely, it’s operating properly and the problem is somewhere else. When that happens, fixing the problem gets slightly more complicated.
Water in a water heater expands when it heats up. In many cases, the expanded water simply gets pushed back into the water inlet, and will in fact move back to the main supply where it comes into the building. The main water supply for a building serves as a massive expansion tank without anybody noticing. This is shown in the illustration below.
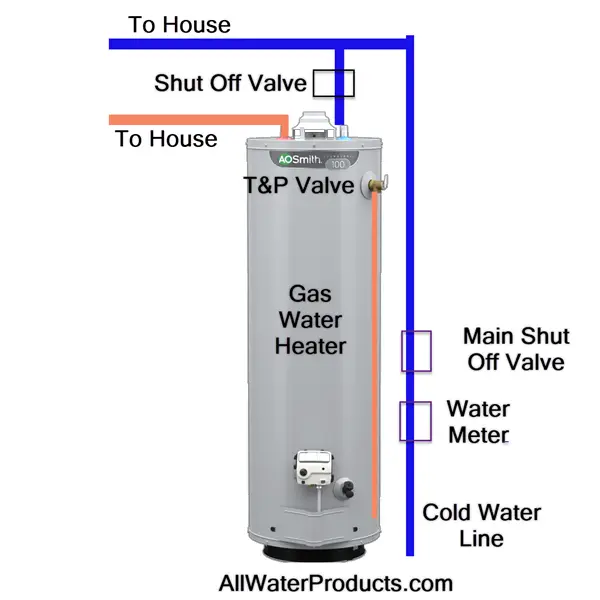
Natural Expansion
However, if a check valve, or one-way valve, is installed in the water piping for a building, this changes the picture completely, as the expanded water wouldn’t be able to go anywhere. When the water gets heated and expands, it increases the pressure in the closed system. Once the pressure gets sufficiently high, the T&P valve should do its job and relieve the extra pressure, thus releasing a small amount of water.
Pressure Regulator Prevents Expansion
In some states, such as Minnesota, a check valve is not often installed on the main water supply line of a house. However, it is fairly normal to install a pressure regulator instead.
When the water coming into a house’s pressure is too high, it is normal to install a pressure regulator.
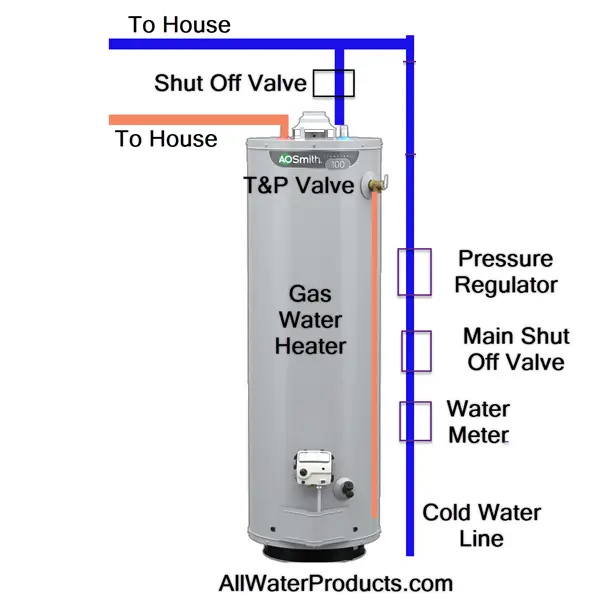
It will be installed on the main water line coming into the house. Its job is to prevent the house’s plumbing components from being damaged.
Those regulators do however function as a check valve by allowing water into the house, but not allowing water back into the supply lines. This effectively produces what is known as a closed system.
This can cause the water heater’s T&P relief valve to leak. Although this does not always happen when a pressure reducing valve is fitted to the system, this may cause other problems around the home, such as faucets chronically dripping or toilets randomly filling.
Fixing Problems Caused by a Closed System
When the water system in a house is a closed system, an expansion tank has to be fitted as part of the plumbing. This fix is fairly straightforward and simple.
The expansion tank will allow the water to go somewhere when it has expanded, resulting in the water heater’s T&P relief valve not causing any problems anymore.
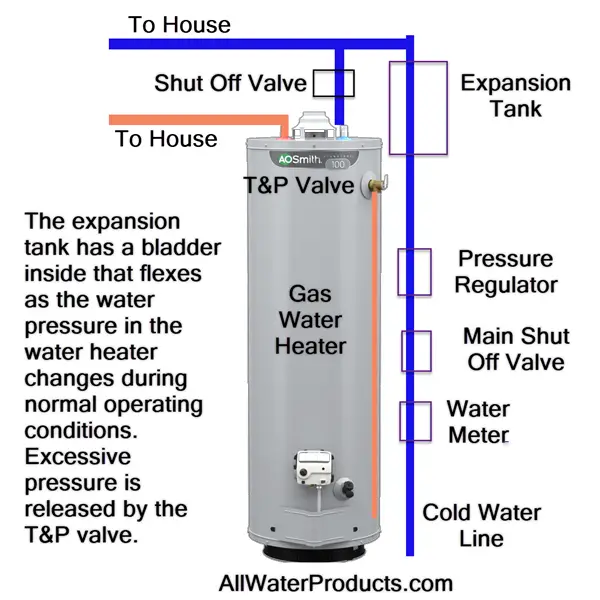
The same thing is true for other types of water heating systems. In a hydronic heating system, the boiler will heat the water and the expansion tank will allow the water expansion without it causing the T&P valve to leak.
If a boiler system’s T&P valve leaks chronically, even after it has been replaced, this is most likely caused by an No products found. problem.
Water Heater Pressure Relief Valve Leaking Conclusions
Now you know what to do with a water heater pressure relief valve leaking after replacement problem. Also, you now know how to diagnose and fix several water heater relief valve leak problems.
The question is: Are you willing and able to do these DIY water heater repairs or not? You you can decide that. Consider how long it’s going to take to buy and install the parts, buy some tools, and live without any hot water.
Also, if you need to install an expansion tank, that requires a building permit and having the work inspected. It also requires specialized knowledge to do it properly and to insure your personal physical safety. It’s time to contact a local plumber. So, fill out the form below right now.
Related articles:
Water Heater Leaking? Find It, Fix It (DIY). Need A Pro?
Water Heater Leaking From Bottom? What To Do? (DIY fixes)
Our All Water Products Home Page is here.
Last update on 2026-01-23 / Affiliate links / Images from Amazon Product Advertising API

The water connections for hot and cold are backwards in the pictures on this page you should fix that as it’s confusing to people when they reference your page unless they know you’re wrong. The page is:
Water Heater Pressure Relief Valve Leaking? What to Do?
Hi Paul, thanks for spotting that and letting me know. I’ll get it fixed as soon as possible.